Note: phiên bản Tiếng Việt của bài này ở link dưới.
https://duongnt.com/stub-idp-vie
This is the last part of a three-part series about single sign-on (SSO) using SAML with OKTA. You can find the other parts from here.
In part two, we looked at how to integrate SSO using SAML into an existing ASP.NET Core web app. Generally, it’s preferable to use a dedicated identity provider (IDP) such as OKTA instead of rolling our own. However, when testing we might want to detach our services from any outside system. For example, we might want to test our app in isolation without connecting to the Internet. Or we want to test our logic only and don’t care about connection issues, etc.
In all the scenarios above, we can set up a stub IDP locally and use it to replace the real IDP. Sustainsys already built one such server at this link, but it is written in .NET Framework. In this article, we will look at how an IDP works and then try to recreate our own IDP using .NET Core.
You can find the code in this article at the following link. My version stripped out some functions we don’t need while adding an option to automatically log a user in without them doing anything.
https://github.com/duongntbk/StubIdpCore
Alternatively, you can also pull a Docker image of that IDP from the following link.
https://hub.docker.com/r/duongntbk/stubidpcore
The metadata
Overview
As mentioned in part two, our web app will redirect users to the OKTA login page for authentication. But how does our app know the location of OKTA? The answer is that it uses the MetadataLocation value we set inside the ConfigurationExtensions class. Our app will access that URL to download a metadata file.
This means the first thing we need to do is building an endpoint to host that metadata file. Let’s look at what our metadata would look like.
<EntityDescriptor cacheDuration="PT15M" validUntil="2021-07-02T13:08:39.1146512Z" entityID="https://localhost:5003/interactive"
	xmlns:saml2="urn:oasis:names:tc:SAML:2.0:assertion"
	xmlns="urn:oasis:names:tc:SAML:2.0:metadata" ID="_a6199cf8611c4c2487276fd544d7f3f1">
	<Signature
		xmlns="http://www.w3.org/2000/09/xmldsig#">
		<SignedInfo>
			<CanonicalizationMethod Algorithm="http://www.w3.org/2001/10/xml-exc-c14n#" />
			<SignatureMethod Algorithm="http://www.w3.org/2001/04/xmldsig-more#rsa-sha256" />
			<Reference URI="#_a6199cf8611c4c2487276fd544d7f3f1">
				<Transforms>
					<Transform Algorithm="http://www.w3.org/2000/09/xmldsig#enveloped-signature" />
					<Transform Algorithm="http://www.w3.org/2001/10/xml-exc-c14n#" />
				</Transforms>
				<DigestMethod Algorithm="http://www.w3.org/2001/04/xmlenc#sha256" />
				<DigestValue>l7uUZhUlwtLS8V4jyUAtIGSSyCpMJFOWhV9rWRugg8s=</DigestValue>
			</Reference>
		</SignedInfo>
		<SignatureValue>dXZuZfrb4+gUaBjvxJDBZF7I49a4cFKH1zrKPz8Dnkce6GKzYFyDfGcXfwk6IZWxkl5nlx5StdLJ9Pfv+l20WkdZVgOnBpvrw8/8lTR237bo1Cl76eayswB8H4zmmrMyUGI0VtKKL/kuMkJXR83bC5pWggUYkuDM4hmgkmclz3E=</SignatureValue>
		<KeyInfo>
			<X509Data>
				<X509Certificate>[Long value omitted]</X509Certificate>
			</X509Data>
		</KeyInfo>
	</Signature>
	<IDPSSODescriptor protocolSupportEnumeration="urn:oasis:names:tc:SAML:2.0:protocol">
		<KeyDescriptor>
			<KeyInfo
				xmlns="http://www.w3.org/2000/09/xmldsig#">
				<X509Data>
					<X509Certificate>[Long value omitted]</X509Certificate>
				</X509Data>
			</KeyInfo>
		</KeyDescriptor>
		<SingleSignOnService Binding="urn:oasis:names:tc:SAML:2.0:bindings:HTTP-Redirect" Location="https://localhost:5003/interactive/login" />
		<SingleSignOnService Binding="urn:oasis:names:tc:SAML:2.0:bindings:HTTP-POST" Location="https://localhost:5003/interactive/login" />
	</IDPSSODescriptor>
</EntityDescriptor>
There are a few interesting fields we should pay attention to.
entityID: this is the ID of the IDP (not our web app) and needs to match the value ofIdentityProviderobject set inConfigurationExtensions.X509Certificate: the public key of the IDP’s certificate. Our web app will use this to verify that the response indeed comes from the IDP.SingleSignOnService: the login endpoint on IDP. Users will be redirected toHTTP-Redirectby our web app, and their credentials will be posted toHTTP-POSTfor verification.
The MetadataHelper class
Sustainsys provides an extension method called ToXmlString to convert a MetadataBase object into string. We use the MetadataHelper class here to build an EntityDescriptor that inherits from MetadataBase, then we call ToXmlString method on it. That EntityDescriptor object holds all the information necessary to connect to our IDP.
public static EntityDescriptor CreateIdpMetadata(string idpEntityId, Uri ssoServiceUrl)
First, we need to set the ID for our IDP.
var metadata = new EntityDescriptor()
{
    EntityId = new EntityId(idpEntityId)
};
Then we need to set the SSO URL.
idpSsoDescriptor.SingleSignOnServices.Add(new SingleSignOnService()
{
    Binding = Saml2Binding.HttpRedirectUri, // change this to Saml2Binding.HttpPostUri, for HTTP-POST binding
    Location = ssoServiceUrl
});
We also need a certificate to sign our response.
idpSsoDescriptor.Keys.Add(CertificateHelper.SigningKey);
The signing key here is added as a KeyDescriptor object. We use the CertificateHelper class here to create this object. This is how we load the certificate from disk.
var executableLocation = Path.GetDirectoryName(Assembly.GetExecutingAssembly().Location);
var keyPath = Path.Combine(executableLocation, "AppData", "stubidp.sustainsys.com.pfx");
return new X509Certificate2(keyPath, "", X509KeyStorageFlags.MachineKeySet);
As you can see, we store our certificate in AppData. Remember that this certificate is only for testing purposes, DO NOT trust it in any other environment.
Using the MetadataHelper class is very simple. We only need to pass in the ID and the login page of our IDP.
var content = MetadataHelper.CreateIdpMetadata(
    "<IDP EntityId>", "<IDP Login page>")
        .ToXmlString(CertificateHelper.SigningCertificate, SignedXml.XmlDsigRSASHA256Url);
Handle user login
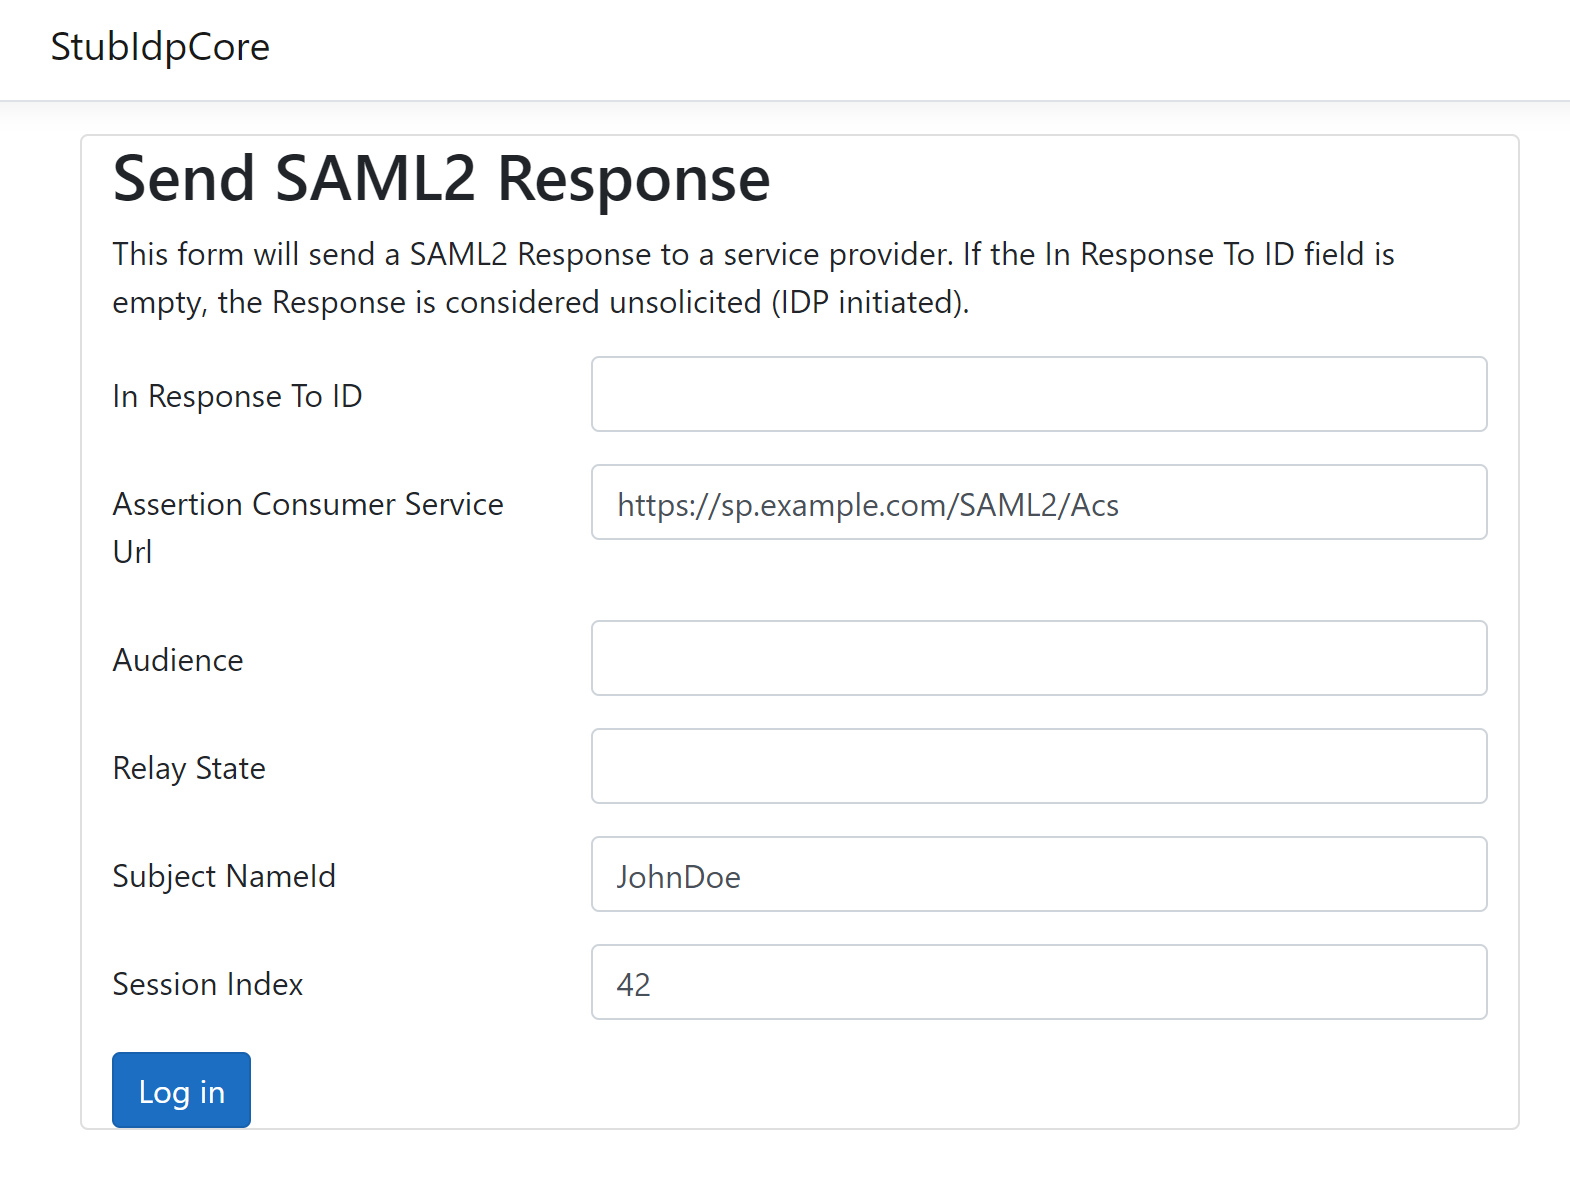
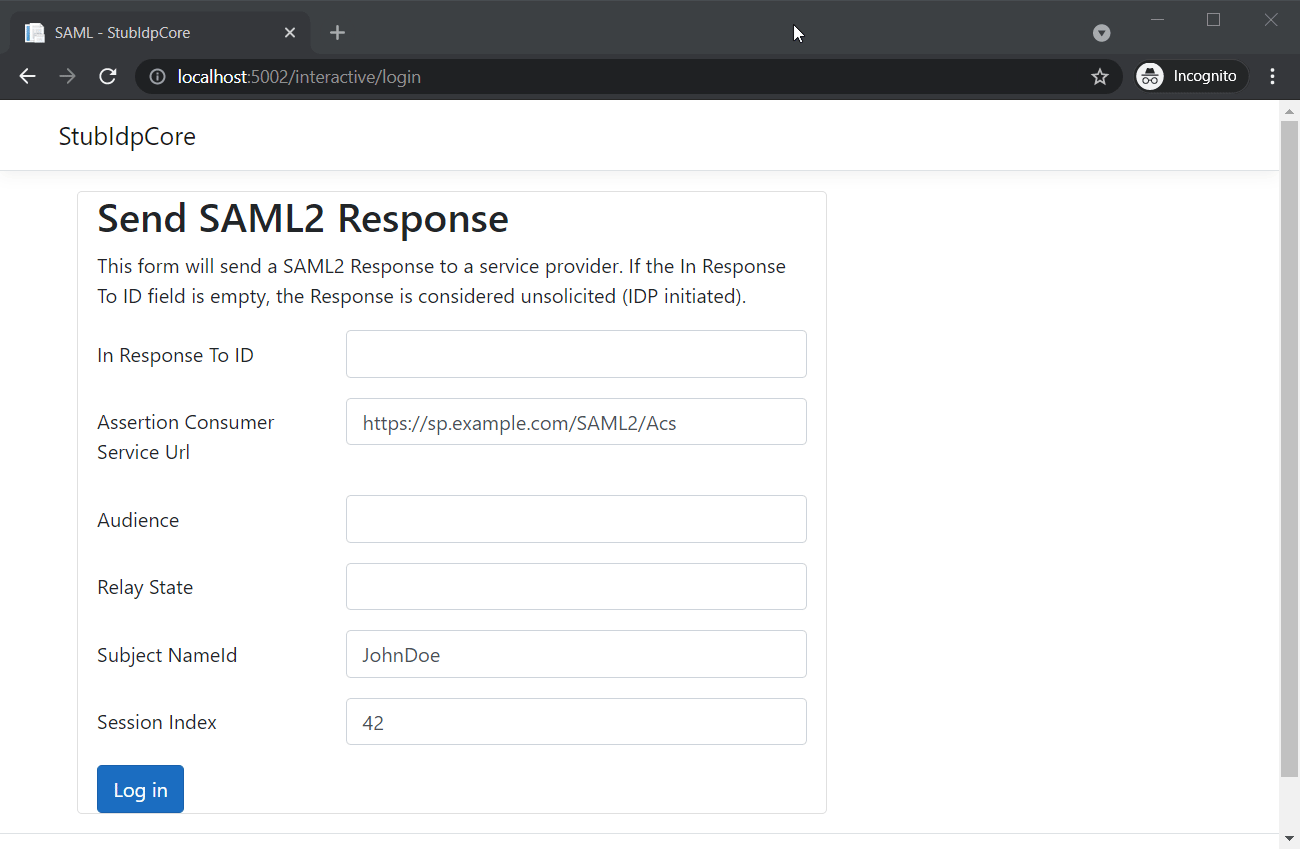
The interactive IDP
For a normal IDP, users’ credentials will be verified before they are logged in, but we won’t do that in our stub IDP. Below is our login page, users can input whatever account they want, and the login request will still pass.
As mentioned in Metadata section, our IDP has two endpoints, HTTP-Redirect and HTTP-POST. First, let’s look at the HTTP-Redirect endpoint.
public ActionResult OnGetLogin()
{
    Model = AssertionModel.CreateFromConfiguration();
    HandleReceivedAuthenRequest();
    return Page();
}
We create the page model using an extension method here. It simply set default values for AssertionConsumerServiceUrl, NameId and SessionIndex.
Remember that in part two, we mentioned that an authentication response can be initiated by our web app or by the IDP itself. We can see how both those scenarios are handled in HandleReceivedAuthenRequest.
For a web app initiated request, we extract all information provided by that web app and populate the corresponding field in the AssertionModel object. But for an IDP initiated request, the requestData will be null and we will display the login form with just the three default values mentioned above. Users will need to fill in the rest.
var requestData = Request.ToHttpRequestData();
var binding = Saml2Binding.Get(requestData);
if (binding != null)
{
    // code to update AssertionModel
}
Next, we’ll look at the HTTP-POST endpoint.
public ActionResult OnPostLogin()
{
    if (ModelState.IsValid)
    {
        // In a real IDP, code to check credentials goes here.
        return HandleReceivedAuthenResponse(UrlResolver.InteractiveIdpEntityId);
    }
    if (Model == null)
    {
        Model = AssertionModel.CreateFromConfiguration();
    }
    return Page();
}
If the page model is invalid (missing AssertionConsumerServiceUrl for example), we simply recreate the AssertionModel and tell users to try again. Otherwise, we craft an authentication response and return it to users using HandleReceivedAuthenResponse method.
var response = Model.ToSaml2Response(entityId);
return Saml2Binding.Get(Model.ResponseBinding)
    .Bind(response).ToActionResult();
Here, we use an extension method called ToSaml2Response to convert our page model (which is an AssertionModel) into a Saml2Response object. Then we use ToActionResult to convert that Saml2Response object into an ActionResult which we return to users.
The automatic IDP
Sometimes we want to log users in without them doing anything. You might wonder why we bother integrating SSO with our app if we are going to bypass it. One scenario where this can be useful is integration testing.
Imagine that your script opens some pages, performs some actions then verifies the results. With SSO enabled and using the interactive IDP above, you have to add additional code to input your credentials and click Sign In button. For tests that don’t care about authentication, all those codes would be noise. Maintenance would be much easier if our tests can access whatever pages they want as if there is no authentication required.
Because our users don’t need to input their credentials anymore, we can ignore the HTTP-POST endpoint. All we care about now is the HTTP-Redirect endpoint.
public ActionResult OnGetLogin()
{
    Model = AssertionModel.CreateFromConfiguration();
    HandleReceivedAuthenRequest();
    return HandleReceivedAuthenResponse(UrlResolver.AutoIdpEntityId);
}
You can see that this endpoint is simply the combination of HTTP-POST and HTTP-Redirect endpoints of the interactive IDP. The changes are below.
- We call HandleReceivedAuthenResponse right after calling HandleReceivedAuthenRequest so that users are logged in right after they are redirected to IDP’s login page.
- Automatic IDP supports web app initiated authentication requests only. The AssertionModel is automatically created using the data inside that request. Because of that, we can skip validating AssertionModel.
Demo
Starting our stub IDP
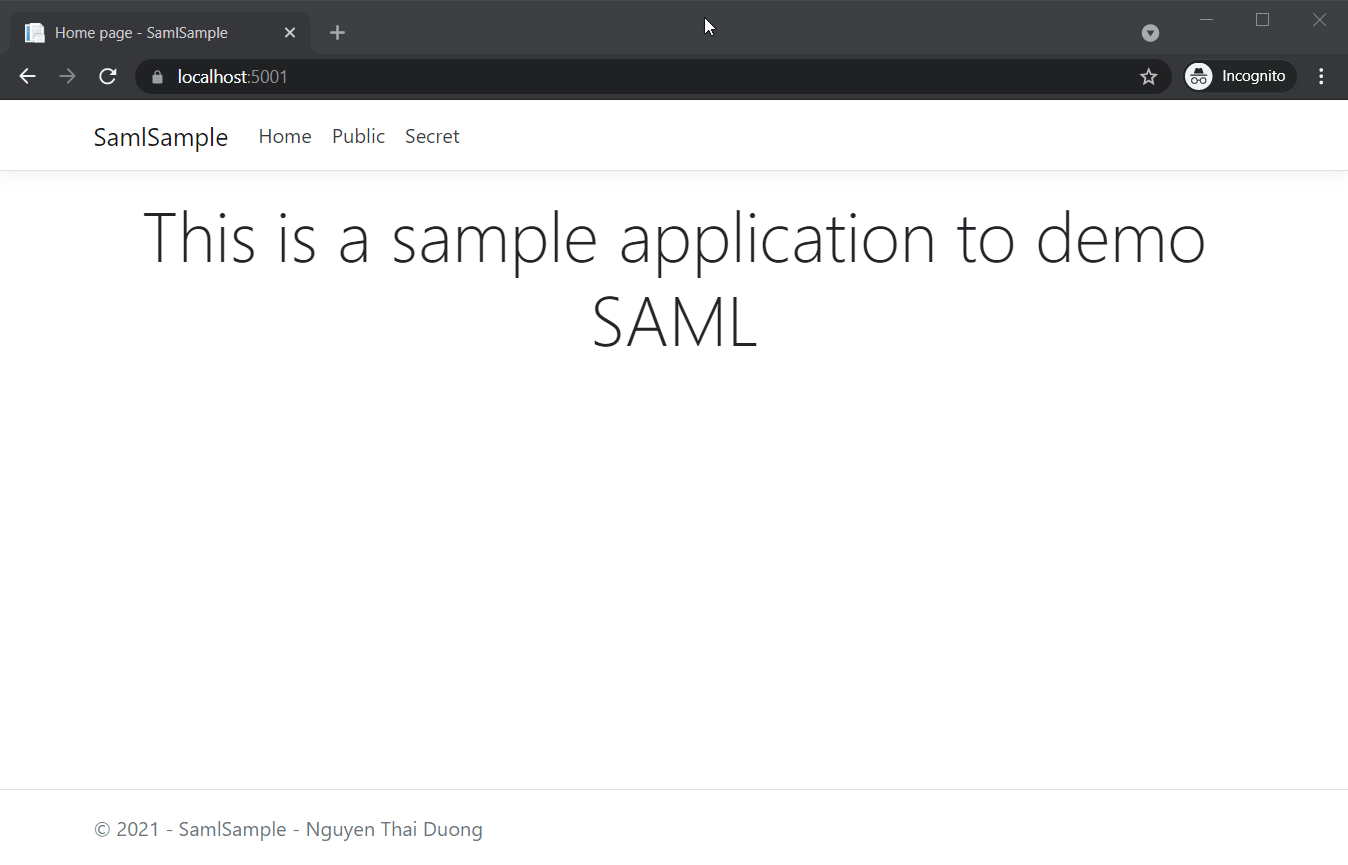
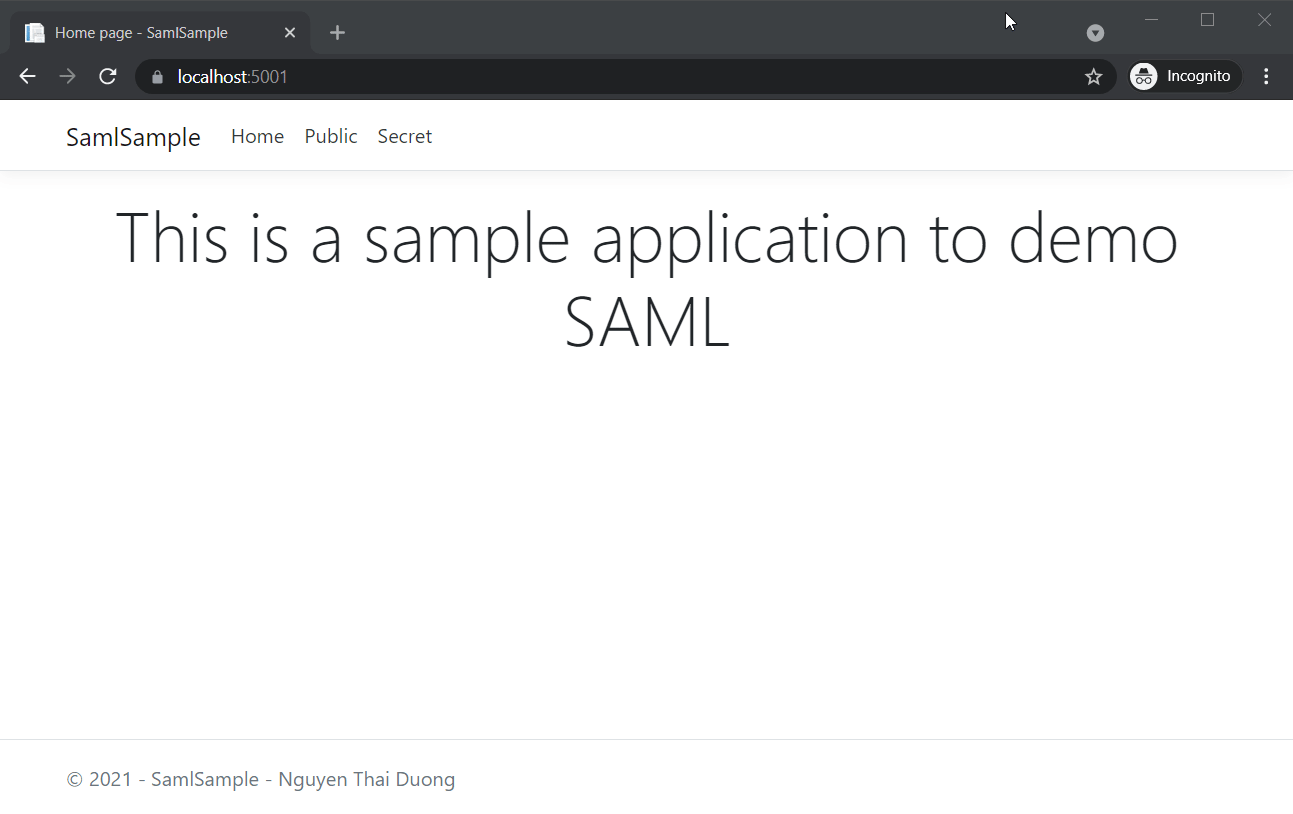
We will demonstrate our stub IDP with the sample application I introduced in part two.
There are two ways to run our IDP. The first one is to clone this repo and execute the following command.
dotnet run
Our IDP will run on http://localhost:5002 and https://localhost:5003.
Or you can start our IDP as a Docker container by running the following command.
docker run -dp 5002:80 duongntbk/stubidpcore:1.0
Our IDP will run on http://localhost:5002 (HTTPS does not work yet in this case).
The interactive IDP
Update the appsettings.json file with the following information.
"Authentication": {
  "Saml": {
    "EntityId": "https://localhost:5001/Saml2",
    "IdentityProviderIssuer": "http://localhost:5002/interactive",
    "MetadataUrl": "http://localhost:5002/interactive/metadata"
  }
}
Users can log in no matter what credentials they use.
It’s also possible to login directly from our IDP.
The automatic IDP
Update the appsettings.json file with the following information.
"Authentication": {
  "Saml": {
    "EntityId": "https://localhost:5001/Saml2",
    "IdentityProviderIssuer": "http://localhost:5002/auto",
    "MetadataUrl": "http://localhost:5002/auto/metadata"
  }
}
Users are automatically logged in when they are redirected to our IDP. Notice that the URL of our IDP on port 5002 is displayed for a split second.
Conclusion
Playing around with a stub IDP is the fastest way to learn about SSO and SAML, because nothing beats hands-on experience. Make sure to check out Sustainsys’s StubIdp as well. I believe that will help you gain invaluable insides.
2 Thoughts on “Set up a stub identity provider for testing”