Note: phiên bản Tiếng Việt của bài này ở link dưới.
https://duongnt.com/fast-feature-extraction-vie
In a previous article, we trained a convolution network to predict gender from an image. Today, we will use fast feature extraction to reduce the training time while improving the accuracy of our model.
You can download all sample code from the link below.
https://github.com/duongntbk/fast_feature_extraction_demo
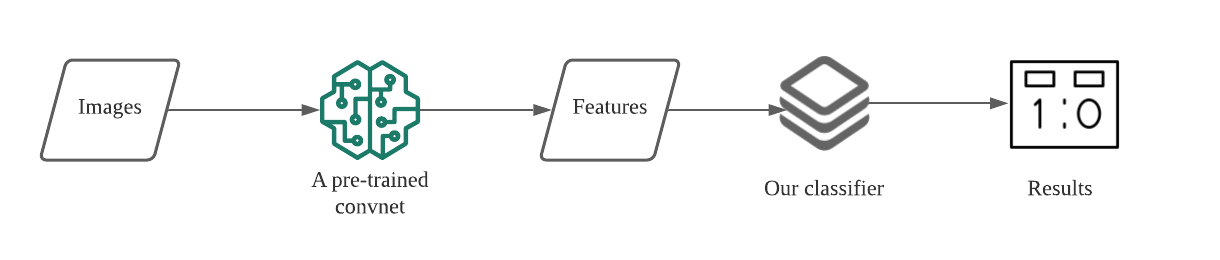
Overview of fast feature extraction
Drawback of our convolution network
The model we trained in the previous article has two issues.
The first issue is that a convolution network is very compute-intensive. Even for a simple network like ours, it still took 6 seconds to train an epoch on my low-end GPU. When I tried to train it with just the CPU, the training time was prohibitive.
The second issue is that due to the low amount of training data, we can only achieve around 91% accuracy on the test dataset. If we increase the model’s capacity, it will just memorize all the data points in the training dataset. This leads to overfitting, when training loss and training accuracy keep improving, but validation loss and validation accuracy stagnate.
Introducing fast feature extraction
As a recap, there are two reasons why a convolution network is so suitable for image processing.
- It has a hierarchy architect. Lower layers can learn more local patterns in an image, like lines or curves. While higher layers can learn more generic patterns made up from patterns in lower layers. This is compatible with the nature of images, where bigger features are formed from smaller ones.
- After learning a pattern from one part of an image, it can apply the same pattern to other parts. This means a convolution network has the power to generalize from the information it has learned.
Thus, if we train a convnet on a big enough dataset, the generic patterns its lower layers have learned can be applied to other image processing problems. This is the basic idea behind fast feature extraction. Below are the new steps to train our model.
- Run the training data through the lower layers of a pre-trained convnet to extract their features.
- Train a classifier on the extracted features. In this case, our classifier doesn’t need to have high capacity.
Fast feature extraction has the following advantages.
- Because the classifier doesn’t need high capacity, and we perform feature extraction in advance, the training step takes little time.
- Thanks to the feature extraction step, we can achieve high accuracy with a small training dataset.
Of course, there is no such thing as a free lunch. Fast feature extraction also has some drawbacks.
- Because the training data is run through a convnet in advance, we cannot perform data augmentation.
- The inference process is more complicated, because we need to feed our data through a pre-trained convnet first.
The pre-trained model we use
We will use the VGG19 model to perform feature extraction. This model was trained on the ImageNet dataset, which consists of millions of images with thousands of labels. Considering the size of the ImageNet dataset, we hope that the generic patterns VGG19 has learned can be applied to our problem.
Keras makes working with VGG19 very simple. We can load a pre-trained model with the code below.
from tensorflow.keras.applications import VGG19

vgg19_base = VGG19(
    include_top=False, # we replace the original classifier with our own.
    weights='imagenet', # load the weights pre-trained on ImageNet
    input_shape=(150,150,3))
Notice that we do not include the original classifier top from VGG19. This is because we want to train a new classifier, more suitable for our problem.
Retrain our model using fast feature extract
Prepare our training data
Just like in the previous article, we will use the face dataset from this link. The first step is to extract features from all images. We will store the extracted features in HDF5 format. Please see this article for an overview of using HDF5 in Python.
from image_to_hdf5 import write_data_to_hdf5

write_data_to_hdf5('dataset/train', 'hdf5_data/train.hdf5')
write_data_to_hdf5('dataset/valid', 'hdf5_data/valid.hdf5')
write_data_to_hdf5('dataset/test', 'hdf5_data/test.hdf5')
There are a some noticeable points in the write_data_to_hdf5 method.
image = load_img(data_paths[i], target_size=(150, 150), interpolation='bilinear') # Load image data from disk
image = img_to_array(image, data_format='channels_last') # Convert image data to tensor
image = preprocess_input(image).reshape(1, 150, 150, 3) # Convert image tensor to VGG19's input format
features = vgg19_base.predict(image).reshape(4*4*512) # This is essentially the same as a Flatten layer
writer.write(features, labels[i]) # Write extracted features to HDF5 file
Tune hyperparameters with KerasTuner
The extracted features have shape (None, 8192). We will run it through a classifier made up of a few Dense layers.
Again, just like in the last article, we will use KerasTuner to find the best combination of hyperparameters. This is our hyper model class. Notice that we use a new method called hp.conditional_scope. This is to make sure that we only add another dense layer if the first dense layer has 32 or 64 units.
if first_dense in [32, 64]:
    with hp.conditional_scope('first_dense', [32, 64]):
        if hp.Boolean('extra_dense_layer'):
            with hp.conditional_scope('conditional_scope', [True]):
                dense = layers.Dense(hp.Choice('extra_dense', [4, 8, 16]), activation='relu')(dense)
We test each combination in 50 epochs and run each test twice. After 160 tests, we got the best combination below.
Hyperparameter    |Best Value So Far
first_dense       |64
dropout_rate      |0.5
extra_dense_layer |False
extra_dense       |None
Which gives us the following architecture.

This is the test loss and test accuracy.
[0.6207340359687805, 0.9470587968826294]
Because the new architecture is so simple, we massively reduced the training time. On my system, training the original convnet took 6 seconds per epoch; but with fast feature extraction, each epoch now only takes 300 milliseconds. This is a 20x improvement and I can even train this model with only my CPU. At the same time, we’ve managed to increase the test accuracy by nearly 4% compared to the last article. You can download the new model from this link.
Make predictions with the new model
As an example, we will run my picture below through our new model.

from tensorflow.keras.applications import VGG19
from tensorflow.keras.applications.vgg19 import preprocess_input
from tensorflow.keras.models import load_model
from tensorflow.keras.preprocessing.image import img_to_array, load_img

model_path = 'gender_prediction_ffe_best.keras'
image_path = 'fast-feature-extraction-example.jpg'

# Load image from disk
image = load_img(image_path, target_size=(150, 150), interpolation='bilinear')
image = img_to_array(image, data_format='channels_last')
image = preprocess_input(image).reshape(1, 150, 150, 3)

# Extract feature using pre-trained VGG19
vgg19_base = VGG19(include_top=False, weights='imagenet', input_shape=(150,150,3))
features = vgg19_base.predict(image).reshape(1, 4*4*512)

# Perform inference
model = load_model(model_path)
result = model.predict(features)
print(result)
Below is the result.
[0.0000000000000013521977]
Since our model uses 0 to label male and 1 to label female, this means our model thinks the example is male with 99.99999999999986478023% certainty. I’m fairly sure that it is correct :).
Conclusion
Fast feature extraction helps us to speed up the training process and improve accuracy, at the cost of doing more work upfront and complicating the inference flow. On low-end systems, especially ones without a GPU, this is an interesting solution.
One Thought on “Utilize fast feature extraction to speed up model training”